CNC 1911 Mostly Finished

The 1911 frame I made on the CNC machine has been sitting on my workbench for way over a year now. I decided that over Thanksgiving vacation I would finally finish the gun. I only had a couple of small machining operations to do on the top of the frame and then it would be finished. When I made my own AR-15 lowers, once I finished machining the lower receivers according to the CAD model it only took 10 minutes or so to install the parts. I figured I would be able to finish up the frame on Friday, and by Sunday, I’d be ready to go to the range.

It turned out to be not so easy.

The first problem was that the slide didn’t fit. The slots in the frame weren’t deep enough. After milling out the slots a bit, I was able to fit the slide.

IMG_20131129_142559
Next, I tried fitting the barrel. With the barrel and associated hardware installed, the slide wouldn’t move.  As the slide is pulled back, the barrel wasn’t lowering enough for the upper barrel lugs to unlock from the slide. I needed to remove some material from where the bottom barrel lugs hit the frame. From what I can tell, this is normally done going in from the front of the frame with a really long end mill. I don’t have an end mill that long, nor is there enough clearance on my mill to use one on a 1911 frame. But since I had made a two piece frame I was able to unbolt the halves, lie them flat, and go in from the side with a small end mill.

IMG_3565
The trick was to remove enough material so that the barrel would go low enough, but not so much that the barrel’s rear motion is stopped by the barrel link. Now the slide and barrel move like they should.

IMG_3567
But, with the chamber all the way closed, the slide sits a little forward.

IMG_3566
Either the slide, barrel, or frame is slightly off somewhere. I can’t think of an easy way to fix it. It doesn’t seem like it’s going to affect the operation any, so I’m going to leave it as is.

Next came the trigger, which, like the slide, didn’t fit at all. I had to widen the trigger area, again made easy by the fact that the frame can be split into two halves.

IMG_3568
After the trigger came the magazine catch, which also didn’t fit. I had to hand file the hole until the magazine catch would drop in. I then discovered that the CAD model I used was missing the slot for the magazine catch lock. I also don’t have any undercutting end mills, so having the slot in the model probably wouldn’t have helped anyway. Since the magazine catch lock is always held against one side of the slot by the spring, I decided to cut a notch from the inside of the frame down to the depth of the slot.

magslot
It’s at the point that I almost ruined the frame. I was making the cuts “manually” by using the keyboard to control the mill. While doing so I brushed against the touchpad that I use for a mouse. What I hadn’t realized before is that the touchpad was configured for tap-to-click, so the touch registered as a click, and the mouse pointer happened to be sitting on the feed rate slider. So the feed rate suddenly went from 0.3 in/min to 60 in/min, and the mill went all the way through the frame and almost into the mill table.

Luckily the place where I drilled through isn’t where the tab on the magazine catch lock normally sits, so while the hole doesn’t look all that nice, the magazine catch is still functional.

_MG_3574
With the magazine catch installed, I tried to insert a magazine, but it didn’t fit. I had to widen the magazine well.

IMG_3571
Now, it was time to install the sear and disconnector. The sear was too wide to fit in the space for the fire control group, so the frame is split and back on the mill again to widen that area a bit.

_MG_3578
With the fire control group area widened out, the sear, disconnector, and hammer all fit nicely. The leaf spring and main spring housing also went in without problems, so now I had a functioning trigger. I then tried to fit the thumb and grip safeties and discovered another problem with the CAD model, which I probably would have noticed earlier if I had ever assembled a 1911 before. The hole for the thumb safety doesn’t go all the way through the frame like it should. So back on the mill to drill out the hole.

_MG_3576
I also had to use a hand file to widen the hole where the thumb safety interacts with the hammer and trigger. Then I discovered with the full fire control group installed the slide won’t go all the way back.

_MG_3579
The hammer hits the top of the grip safety. It appears that the parts kit I ordered came with a mismatched hammer and grip safety. There are other style hammers that fit fine with that grip safety, and other style grip safeties that will fit with that hammer, but the ones I have don’t go together. I bought the parts kit over a year and a half ago, so its probably to late to do a warranty exchange. But a little work with a grinding wheel on the top of the grip safety and…

gripsafety
Next was tapping the holes for the grip screw inserts, which of course had to be some oddball-sized tap that I didn’t have, so I had to order a tap.

_MG_3577
The grips themselves and the plunger tube fit with no issues. The last piece that needed to be attached to the frame was the ejector. Here, I discovered a third problem with the CAD model. One of the holes for the ejector was only half as deep as it should be. So back on the mill one more time.

_MG_3581
Now, with the ejector attached to the frame, the firing pin and extractor installed in the slide, and the slide and barrel back on the frame, I have a completed firearm.

IMG_3588
Everything seems to function correctly, and the headspace looks good. (I don’t need to buy a chamber reamer. Yay!) All that’s left to do is to decide how I want to “permanently” join the two frame halves. Currently, they are held together by just two bolts near the center of the frame. My original plan was to use an aluminum brazing rod to weld the two halves together, but looking at the finished frame I think if I add one more bolt in the top front of the trigger guard, and use a bolt instead of a pin to hold in the main spring housing it would work fine without welding.

Can You Shoot .22LR in This Rifle?

[Guest bleg from sometimes guest blogger Jason. I didn’t know the answer to this so I asked him to post the question to all of you. – Sebastian]

I have a Winchester model 1902 rifle that’s been in the family since at least 1920, when my grandfather carved his name and the year into the stock.

IMG_20131102_220738

The barrel is marked “22 SHORT LONG OR EXTRA LONG.” Does anyone know if its safe to use .22 Long Rifle or high velocity .22 Long Rifle in this gun? A .22LR round seems to chamber ok, but I can’t find any decent information on whether or not the higher pressures or different bullet geometry will cause problems if fired.

Update: some more pictures:

Continue reading “Can You Shoot .22LR in This Rifle?”

Why the CNC 1911 Isn’t Finished, or Rebuilding a DeLorean Engine.

The CNC 1911 I’ve been working on currently looks like this …

… which is pretty much how it looked four months ago. It still needs a fair bit of machining in order to get all the parts to fit. The problem is what little time I have for hobbies has been taking up by other things. First I decided to paint my basement, and before that got finished, I discovered my car had a head gasket leak.

Unfortunately, because of the type of engine, its age, and high mileage, it makes more sense to do an engine swap or full rebuild than to just replace the head gaskets. The main problem is that the engine has paper seals at the bottom of the cylinder liners, and there is a good change they will break when you remove the cylinder heads, which you may not know until you put everything back together and run the engine. If they break, to replace them, you have to pull the engine and remove the pistons. If you’re going that far you might as well do a full rebuild.

Continue reading “Why the CNC 1911 Isn’t Finished, or Rebuilding a DeLorean Engine.”

How to CNC an AR-15 Lower from Delrin

UPDATE (From Sebastian): If you choose to make a lower from Delrin, you’re safest using Food Grade Delrin, which is highly x-ray detectable. While I believe ordinary Delrin should be dense enough to be detectable by the modern equipment used for airport screening, it is unlawful to make a firearm, the major component (which includes the receiver) does not show its true shape on the types of x-ray equipment commonly used for airport screening. Be careful about the types of plastic you choose. Jason did not mention this in the original post, but I am updating now as a warning. You are responsible for compliance with federal law.

After finishing the aluminum bolt together lower, I went back to trying to make a single piece lower out of Delrin.

The process described below is my third attempt. In the first two I had alignment problems which made the right and left sides not quite match up and gave an egg shape to some of the holes.

I also switched from PyCAM to Deskproto. While the people working on PyCAM have done a nice job so far, it needs more work. For the kind of things I do its just barely useable. Deskproto has all the things that drive me nuts in PyCAM fixed, and while its commercial, the cost, especially for a hobby license, is quite reasonable (less than an AR-15 parts kit) and it doesn’t use any nasty DRM, so after you’ve purchased it you don’t have to get permission from the mother ship to reinstall it or install it on a different computer.

In Deskproto, I added support bridges to the model that run through the buffer tube hole and magazine well.

This way I could use the outside edges of the Delrin block for holding down the part while machining the left and right sides, but don’t need to do extra machining steps later to remove the supports.

Update: The 3d model of the lower is originally from www.cncguns.com.


I used an inexpensive Chinese import band saw to cut the block of Delrin down to an appropriate size….

Continue reading “How to CNC an AR-15 Lower from Delrin”

CNC Milled AR-15: Final Painting

To finish up the AR-15 pistol I milled on my CNC machine, I decided to try Alodine and then Duracoat instead of anodizing. I wanted a process I could do myself, and while I probably could have managed anodizing at home, the process seemed more complicated than I wanted to get into right now, nor do I have a good place to set things up. Buckets of acid wired to a high current power supply aren’t a good things to have lying around with small children in the house.

The basic process is to coat the parts with Alumiprep (a phosphoric acid based etcher/cleaner), wait a few minutes, rise with water, coat with Alodine, wait a few more minutes, rinse with water, let dry, and then airbrush on Duracoat.

The first attempt at applying Duracoat didn’t go so well. After I was done I noticed a few tiny areas around some bolt holes that I missed. I decided to just mix up a little Duracoat in a cup and do some touch ups with a brush. This turned out to be a bad idea for two reasons. One, Duracoat doesn’t look the same when its brushed on. The instructions do say only to airbush it, but I though that for such a small area (1mm so square) it wouldn’t matter. But it does. Two, Durocoat dissolves plastic cups. After I was done when I picked up the cup the bottom fell out and I ended up with paint all over my work table. Luckily Duracoat wipes off pretty easily if you get it before it dries.

Then when I went to assemble the gun, even though I waited the recommended 24 hours for the paint to dry, it chipped off in a few places. Argh! So I airbrushed on a few more coats..

…and then put the parts in the oven at 120 degrees for a hour to speed dry it. This time there was no chipping and no funky spots from the brush touch ups.

CNC machining an AR-15 lower update and slight detour

In the comments of my last post, Grego pointed out firearmfiles.com where there are CAD files for a multi-part AR-15 lower where all the parts fit nicely in the working area of a Taig mill. It also doesn’t require any special jigs or the crazy long, thin drill bit for making the hole for the bolt catch pin. Since I wouldn’t need to make any jigs or buy any drill bits to finish that version, I figured I’d try it before continuing on with the normal one-piece lower. I went straight to aluminium since I had a slab the right thickness.

Starting to mill the left half of the lower out of a slab of aluminium.

After the end of the roughing pass, where you can see some pretty crappy edges because I was making cuts that were too aggressive for the Taig.

After a couple of contouring passes to give it the right shape.

After the finishing pass.

Now, use a band saw to cut off the excess aluminium block, flip the part over, and start roughing the other side.

The four completed parts of the lower and the bolts that hold them together.

The finish is funky on the inside of one of the halves because, due to software issues, I was having trouble getting accurate Z positioning.  I managed to fix the problem for the other parts.

The assembled lower.

With the fire control parts installed.

And, finally, the completed firearm.

That’s everything except the bolt catch. Since the bolt catch is held on by a press in roll pin, I’m going to leave that off until the lower is painted, rather than have to press it out again to do the painting.  My plan is to treat with Alodine and then spray on Duracoat. I think that should work out pretty well, and it is easier than anodizing.

I modified the design a bit from the original. My version is thinner (though still not as thin as a standard AR lower), and instead of using a custom extended selector switch, I cut a recess so that a standard selector switch would fit.

Now that that’s done, I’m going to try to finish the one piece Delrin lower. But first, I think I need to make some sort of enclosure for the mill to keep the chips from getting all over the place. When working on parts that big, it makes a hell of a mess. Normally, when I use the mill for work, I’m just working with small Delrin parts, making cutouts in aluminium sheets, or etching small printing circuit boards.

CNC machining an AR-15 lower

The following is a post by my friend Jason, who is not a regular contributor, but has posted in the past on our 3D magazine printing project. I thought this would be an interesting addition, and a demonstration of how technology is making gun control a virtual impossibility. Below is his post.

-Sebastian

I’ve been meaning to try this for a while now (using the AR-15 lower receiver solid model from http://www.cncguns.com/downloads.html), but I wanted to do it using all open source software, and was having trouble finding something that could generate tool paths from the AR-15 model. PyCAM seemed to be the best bet, but whenever I tried it on very complex model it would very quickly use up all the memory (8GB of ram plus 8GB of swap) and bring the computer to a screeching halt.

I recently had a project at work where I needed to make a much simpler part, and not wanting to go back to using BobCAD under Windows, I gave HeeksCAD and PyCAM a try. It worked out pretty well, and in the process I discovered and fixed a memory leak in PyCAM

PyCAM is still horribly inefficient in its memory usage, but with the memory leak fixed and a new computer with 16GB of ram I was finally able to generate decent toolpaths for the AR-15 lower.

The equipment/software:

So now I’m all set to give this a try, but I can’t find the block of aluminum I had intended to use. But I did have a block of Delrin left over from an earlier project, and Delrin should be strong enough to handle a .22 cal upper. So I’m trying to make a delrin lower first for use with a .22 cal upper, and if that works I’ll order some aluminum and make another lower for use with a .223 upper.

Note that I’m not an expert in material properties (nor a machinist) so don’t take the above statements to mean that its safe to fire an AR-15 made of Delrin. Do at your own risk.

The original block of Delrin.

Original Block of Delrin to Make into AR-15 Lower


After a first pass rough cut with a 0.25″ diameter end mill.

First Cuts with CNC Mill AR-15 Delrin Lower Receiver


After a second pass using a 0.125″ end mill and a much smaller grid size.

Second pass with CNC mill on Delrin block to make AR-15 lower


After a finishing pass with a 0.125″ ball nose mill.

Final Pass AR-15 Lower Delrin CNC


Now things are going to get a little complicated. I’m going to have to make some sort of jig to hold the part in place while I machine the other side.

Jason on Printer Issues

My goal was to try to come up with a design where if you had one of these low cost ABS printers, you could just download the file, print the parts, superglue them together, add the spring, and you’d have a working 32 round magazine.

Right now I’m at the point where you can download the file, print the parts, superglue them together, sand like crazy, add the spring, and you would have a somewhat finicky 20 to 25 round magazine.

The problem I’m having is a combination of ABS being a bit too flexible and software issues with tool path generation. The walls of the magazine needs to be at least a couple millimeters thick and solid in order to prevent excessive flexing. The tool path generating software (Skeinforge) doesn’t deal well with thin solid walls whose thickness is some uneven multiple of the print head width. For example, if the wall thickness is 3.5 times that of the print width, it will generate one pass along the outer surface of the wall, one pass along the inner surface, and then one more interior pass against either the outside or inside surface. But that leaves the remaining 0.5 of the wall thickness unfilled, and you end up with a hollow very flexible wall. What it really should be doing is a zig-zag like pass over the wall interior. I can trick Skeinforge into filling in the walls completely by lying to it about print head width, but the wall surfaces end up off a bit and then I have issues with the magazine fitting in the mag well or the rounds fitting in the magazine. So I’ve been tweaking the wall thickness and print head size setting in order to try to get Skeinforge to do what I want.

The right solution is probably to modify Skeinforge so that it will generate the correct tool paths from the correct model, rather than adjusting the model to try to make up for Skeinforge’s deficiencies.

Other than the flexing issue ABS seems to be strong enough. I have one magazine I printed which can hold the full 32 rounds and feeds fine, but it bulges so much when fully loaded that it won’t fit in the mag well. The one magazine rupture I had was due entirely to a mistake in the cad file that caused the printer not to correctly bond the insert pieces (where one section of the mag body fits into another) to the rest of the part.

M950 out of battery detonation update

I discovered Calico is still in business. They managed to survive the hi-cap magazine ban. So I gave them a call.

While they have never heard of the exact failure mode I had, they said that with the older bolt design (which my gun has), they have seen a few rare cases of the gun firing out of battery as the bolt is closing. As Armed Canadian pointed out the bolt was damaged when the shell ruptured. For around $100 they’ll repair the bolt and upgrade it to the current design. If I ship them the whole gun they’ll clear the barrel, inspect everything, and test fire it.

The people in charge of the gun club where the accident occurred are interested in what happened, so I’m going to do a little show and tell there (any maybe give them my eyeglass lens to stick up on the bulletin board), and then I’ll probably ship the gun off to Calico.

Demonstration of why you should wear safety glasses while shooting

Yesterday I was shooting my Calico M950.

m900

This is a 9mm pistol with a 100 round helical magazine that feeds from the top.

I had a round that failed to go off when I pulled the trigger. I waited a minute to make sure it wasn’t a hang fire, cleared the round from the gun, set it aside, and finshed shooting the contents of the magazine.

I removed the magazine from the gun, made sure it was empty, locked to bolt back (it doesn’t lock automatically) and made sure the breech was empty.

So now I had this one bad round left. I could see the dimple on the primer from the firing pin, so it was struck. The round otherwise looked normal. I figured I might as well see if I can get it to fire (this was probably bad move #1).

I dropped the round into the breech, released the bolt, and without inserting the magazine (this was bad move #2), aimed, and fired.

There was an exceptionally bright flash from the top of the gun. My first though was…

You know, it’s probably not a good idea to fire this particular gun without the magazine inserted.

Then I felt something strike me in the face. My next thought was….

Yes, its definitely not a good idea to fire this gun without the magazine inserted.

At this point I’m thinking that the shell, instead of ejecting downward, ejected upward though where the magazine feeds and hit me in the face. This shouldn’t happen though. The ejector pin is part of the bolt assembly, and should function even without the magazine.

I set the gun down, and reach up to check my face for damage. My next though was…

Wow. Thats a awful lot of blood.

I don’t however, feel any major damage. So where is all the blood, now all over my shirt and all over the floor, coming from? Teeth! Check teeth!. Ah, good, all my teeth are intact. The inside of my upper lip does feel a little strange though. So, ok, shell ejects backwards, hits my upper lip, pushing it into my teeth, tearing the inside. Not fun, but I’ll live. I get a handkerchief from my dad (who was standing next to me), and use it to stop myself from bleeding all over everything. My dad doesn’t see anything on my face that makes him want to dial 911, and the bleeding quickly slows to something that isn’t scary. Ok. Time to pack up, head home, and get cleaned up.

I pick up the M900, and go to open the bolt to make sure the gun is empty before putting it away in the case. Hmmm. The bolt is jammed closed. And then I notice something metallic on the inside of my upper lip. I discover what seems to be a tiny piece of shell casing that has obviously gone through the front of my upper lip and out the back. And there is a large chip knocked out of the front of my glasses.

So the gun somehow sprayed shrapnel at me. I decide I better go to the ER and get an x-ray to make sure there aren’t any metal bits somewhere scary that I haven’t noticed. So we pack up the guns, hop in the car, and go.

On the way there I call my wife. “First, before I say anything else, I’m ok, so don’t worry. I’m going to be home a little late…….”

At the ER its determined that all the wounds are tiny and don’t require any bandaging or stitches, and that there is one metal fragment stuck in my right cheek and one just at the top of the left eye socket. Most of the blood came from the one small hole that went all the way through my upper lip.

I always wear glasses, so I don’t normally think about the need to wear safety glasses while shooting, but it should be noted here that had I not been wearing glasses, I would have lost my right eye.

glasses

So now I need to go see a plastic surgeon to decide if the fragments should be removed.

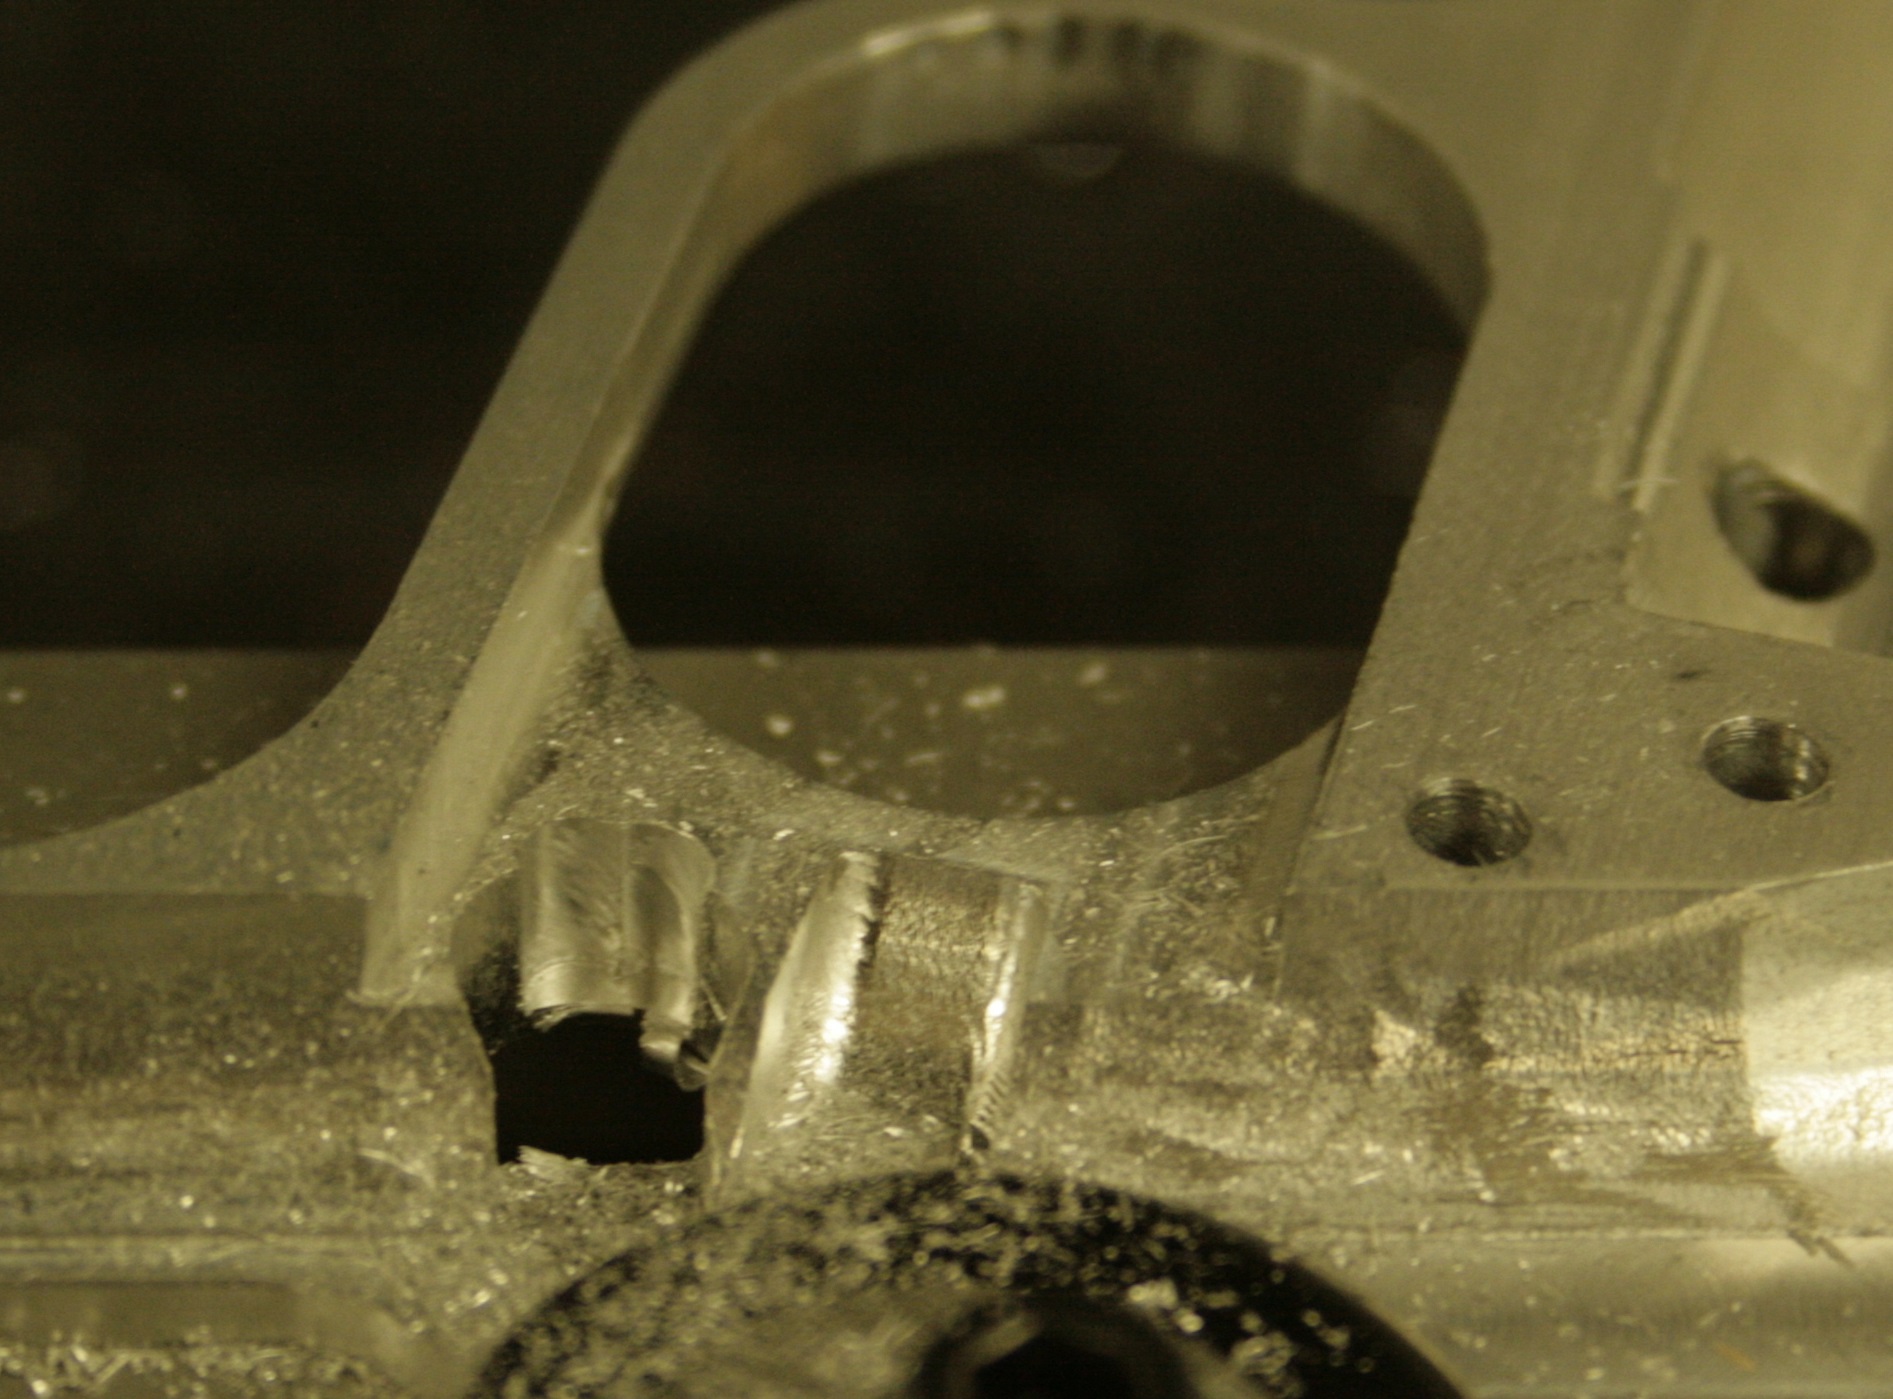
I got home that evening, and did an ‘autopsy’ on the gun. With the bolt removed you can see where the shrapnel came from.

badshell

The shell never ejected. Instead the primer and top of the shell blew out.

shell

The bullet is lodged in the barrel, about an inch down from the breech. So it looks like the gun fired without the bolt all the way closed, and without the magazine inserted there was a fairly direct path from the exploding shell casing to my face.

Whats strange is that bolt is designed so that this can’t happen. There are a set of rollers on the bolt. With the rollers retracted, the firing pin can’t reach the shell.

boltsafe

Only with the rollers extended will the firing pin hit the primer.

boltfire

and there is only space for them to extend like that when the bolt is fully closed.

receiver

So at this point I’m not sure what went wrong or how to make the gun safe to fire again.